Documentation
Sequence to Sequence Modeling
In this project we explain the sequence to sequence modeling using [Pytorch].
What is the problem?
Machine Translation(MT) is one of the areas of NLP that has been profoundly affected by advances in deep learning. In fact, progress in MT can be categorized into pre-deep learning and deep learning era. Confirmation of this could be some of the reference books in NLP community such as ”Speech and Language Processing”. Second version of this book was published in 2008 and chapter 25 is dedicated to machine translation but there is not a single mention of deep learning usage for MT. However, today we know that the top performing machine translation systems are solely based on neural networks which led to the term Neural Machine Translation (NMT).
When we use the term neural machine translation, we are talking about applying different deep learning tech- niques for the task of machine translation. It was after success of neural network in image classification tasks that researchers started to use neural networks in machine translation. Around 2013 research groups started to achieve breakthrough results in NMT and boosted state of the art performance. Unlike traditional statistical machine transla- tion, NMT is based on an end-to-end neural network that increases the performance of machine translation systems.
We dedicate this project to a core deep learning based model for sequence-to-sequence modeling and in particular machine translation: An Encoder-Decoder architecture based on Long-Short Term Memory (LSTM) networks.
What makes the problem a problem?
Although sequence to sequence modeling scope is broader than just the machine translation task, the main focus on seq-2-seq research has been dedicated to MT due to its great importance in real-world problems. Furthermore, machine translation is the bridge for a universal human-machine conversation.
What is the secret sauce here?
Here, we tried to achieve some primary goals as we hope to make this work unique compared to the many other available tutorials:
1. We called this repo
"from scratch"due to the fact that we do NOT consider any background for the reader in terms of implementation.2. Instead of using high-level package modules, simple RNN architectures are used for demonstration purposes. This helps the reader to
understand everything from scratch. The downside, however, is the relatively low speed of training. This may not cause any trouble as we try to train a very small model.3. The difference between
uni-directional LSTMsandbi-directional LSTMshave been clarified using the simple encoder-decoder implementation.
Who cares?
It tutorial has been provided for the developers/researchers who really want
to start from scratch and learn everything spoon-by-spoon. The goal is to
give as much detail as possible so the others do NOT have to spend the time to
understand hidden and yet very important details.
Model
The goal here is to create a sequence-to-sequence mapping model which is going to be built on an
Encoder-Decoder network. The model encode the information into a specific representation. This representation
later on will be mapped as a target output sequence. This transition makes the model understand the interoperibility
between two sequences. In another word, the meaningful connection between the two sequence will be created. Two important
sequence to sequence modeling examples are Machine Transtional and Autoencoders. Here, we can do both just by
chaning the input-output language sequences.
Word Embedding
At the very first step, we should know what are the input-output sequences and how we should represent the data
for the model to understand it. Clearly, it should be a sequence of words in the input and the equivalent
sequence in the output. In case of having an autoencoder, both input and output sentences
are the same.
A learned representation for context elements is called word embedding in which the words with similar meaning, ideally,
become highly correlated in the representation space as well. One of the main incentives behind word embedding representations
is the high generalization power as opposed to sparse higher dimensional representation. Unlike the traditional
bag-of-word representation in which different words have quite different representation regardless of their usage,
in learning the distributed representation, the usage of words in the context is of great importance which lead to
similar representation for correlated words in meaning. The are different approaches for creating word embedding. Please
refer to the great Pytorch tutorial titled [WORD EMBEDDINGS: ENCODING LEXICAL SEMANTICS]
for more details.
Encoder
The encoder generates a single output vector that embodies the input sequence meaning. The general procedure is as follows:
- In each step, a word will be fed to a network and it generates an output and a hidden state.
- For the next step, the hidden step and the next word will be fed to the same network (W) for updating the weights.
- In the end, the last output will be the representative of the input sentence (called the “context vector”).
The EncoderRNN attribute is dedicated to the encoder structure. The Encoder in our code,
can be a unidirectional/bidirectional LSTM. A Bidirectional LSTM consists of two
independent LSTMs, one take the input sequence in normal time order and the other one
will be fed with the input sequence in the reverse time order. The outputs of the two
will usually be concatenated at each time step (usually the last hidden states will be concatenated
and returned). The created feature vector will represents the initial hidden states of the decoder. The
architecture of a bi-lstm is as below:
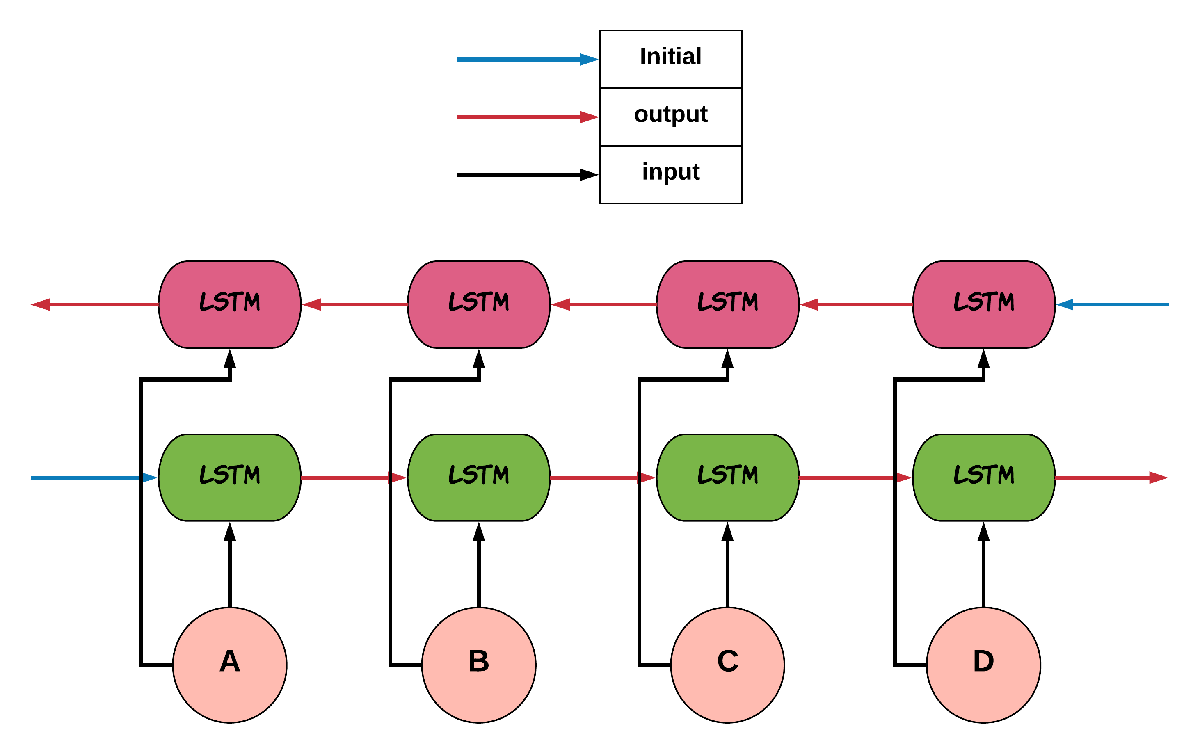
NOTE: As can be observered in the figure colors, two independent different set of
weights MUST be considered for the forward and backward passes, Otherwise, the network will
assume the backward pass follows the forward pass!!
The encoder, will generally be initialized as below:
def __init__(self, hidden_size, input_size, batch_size, num_layers=1, bidirectional=False):
   """
   * For nn.LSTM, same input_size & hidden_size is chosen.
   :param input_size: The size of the input vocabulary
   :param hidden_size: The hidden size of the RNN.
   :param batch_size: The batch_size for mini-batch optimization.
   :param num_layers: Number of RNN layers. Default: 1
   :param bidirectional: If the encoder is a bi-directional LSTM. Default: False
   """
   super(EncoderRNN, self).__init__()
   self.batch_size = batch_size
   self.num_layers = num_layers
   self.bidirectional = bidirectional
   self.hidden_size = hidden_size

   # The input should be transformed to a vector that can be fed to the network.
   self.embedding = nn.Embedding(input_size, embedding_dim=hidden_size)

   # The LSTM layer for the input
   self.lstm = nn.LSTM(input_size=hidden_size, hidden_size=hidden_size, num_layers=num_layers)
NOTE: We do NOT generate the whole LSTM/Bi-LSTM architecture using Pytorch. Instead, we just use
the LSTM cells to represent what exactly is going on in the encoding/decoding phases!
The initialization of the LSTM is a little bit different compared to the LSTM [Understanding LSTM Netwroks]. Both cell state and hidden states must be initialized as belows:
def initHidden(self):

  if self.bidirectional:
      encoder_state = [torch.zeros(self.num_layers, 1, self.hidden_size, device=device),
                                torch.zeros(self.num_layers, 1, self.hidden_size, device=device)]
      encoder_state = {"forward": encoder_state, "backward": encoder_state}
      return encoder_state
  else:
      encoder_state = [torch.zeros(self.num_layers, 1, self.hidden_size, device=device),
                        torch.zeros(self.num_layers, 1, self.hidden_size, device=device)]
      return encoder_state
As it can be seen in the above code, for the Bidirectional LSTM, we have separate and independent
states for forwards and backward directions.
Decoder
For the decoder, the final encoder hidden state (or the concatenation if we have a bi-lstm as the encoder)
of the encoder will be called context vector. This context vector, generated by the encoder, will
be used as the initial hidden state of the decoder. Decoding is as follows:
At each step, an input token and a hidden state is fed to the decoder.
- The initial input token is the
<SOS>.- The first hidden state is the context vector generated by the encoder (the encoder’s last hidden state).
The first output, should be the first word of the output sequence and so on.
The output token generation ends with
<EOS>being generated or the predefined max_length of the output sentence.
After the first decoder step, for the following steps, the input is going to be the previous word prediction of the RNN.
So the output generation will be upon the network sequence prediction. In case of using teacher_forcing, the input is going to be the actual
targeted output word. It provides better guidance for the training but it is inconsistent with the evaluation stage as
targeted outputs do not exists! In order to handle the issue with this approach, new approaches have been proposed.
The decoder, will generally be initialized as below:
def __init__(self, hidden_size, output_size, batch_size, num_layers=1):
    super(DecoderRNN, self).__init__()
    self.batch_size = batch_size
    self.num_layers = num_layers
    self.hidden_size = hidden_size
    self.embedding = nn.Embedding(output_size, hidden_size)
    self.lstm = nn.LSTM(input_size=hidden_size, hidden_size=hidden_size, num_layers=1)
    self.out = nn.Linear(hidden_size, output_size)

def forward(self, input, hidden):
    output = self.embedding(input).view(1, 1, -1)
    output, (h_n, c_n) = self.lstm(output, hidden)
    output = self.out(output[0])
    return output, (h_n, c_n)

def initHidden(self):
    """
    The spesific type of the hidden layer for the RNN type that is used (LSTM).
    :return: All zero hidden state.
    """
    return [torch.zeros(self.num_layers, 1, self.hidden_size, device=device),
            torch.zeros(self.num_layers, 1, self.hidden_size, device=device)]
Encoder-Decoder Bridge
The context vector, generated by the encoder, will be used as the initial hidden state of the decoder.
In case that their dimension is not matched, a linear layer should be employed to transformed the context vector
to a suitable input (shape-wise) for the decoder cell state (including the memory(Cn) and hidden(hn) states).
The shape mismatch is True in the following conditions:
- The hidden sizes of encoder and decoder are the same BUT we have a bidirectional LSTM as the Encoder.
- The hidden sizes of encoder and decoder are NOT same.
- ETC?
The linear layer will be defined as below:
def __init__(self, bidirectional, hidden_size_encoder, hidden_size_decoder):
    super(Linear, self).__init__()
    self.bidirectional = bidirectional
    num_directions = int(bidirectional) + 1
    self.linear_connection_op = nn.Linear(num_directions * hidden_size_encoder, hidden_size_decoder)
    self.connection_possibility_status = num_directions * hidden_size_encoder == hidden_size_decoder

def forward(self, input):

    if self.connection_possibility_status:
        return input
    else:
        return self.linear_connection_op(input)
Dataset
NOTE: The dataset object is heavily inspired by the official Pytorch tutorial: [TRANSLATION WITH A SEQUENCE TO SEQUENCE NETWORK AND ATTENTION]
The dataset is prepaired using the data_loader.py script.
At the first state we have to define word indexing for further processing. The word2index is the dictionary of
transforming word to its associated index and index2word does the reverse:
SOS_token = 1
EOS_token = 2

class Lang:
  def __init__(self, name):
      self.name = name
      self.word2index = {}
      self.word2count = {}
      self.index2word = {0: "<pad>", SOS_token: "SOS", EOS_token: "EOS"}
      self.n_words = 3  # Count SOS and EOS

  def addSentence(self, sentence):
      for word in sentence.split(' '):
          self.addWord(word)

  def addWord(self, word):
      if word not in self.word2index:
          self.word2index[word] = self.n_words
          self.word2count[word] = 1
          self.index2word[self.n_words] = word
          self.n_words += 1
      else:
          self.word2count[word] += 1
Unlike the [Pytorch tutorial] we started
the indexing from 1 by SOS_token = 1 to have the zero reserved!
In the end, we define a dataset class to handle the processing:
class Dataset():
    """dataset object"""

    def __init__(self, phase, num_embeddings=None, max_input_length=None, transform=None, auto_encoder=False):
        """
        The initialization of the dataset object.
        :param phase: train/test.
        :param num_embeddings: The embedding dimentionality.
        :param max_input_length: The maximum enforced length of the sentences.
        :param transform: Post processing if necessary.
        :param auto_encoder: If we are training an autoencoder or not.
        """
        if auto_encoder:
            lang_in = 'eng'
            lang_out = 'eng'
        else:
            lang_in = 'eng'
            lang_out = 'fra'
        # Skip and eliminate the sentences with a length larger than max_input_length!
        input_lang, output_lang, pairs = prepareData(lang_in, lang_out, max_input_length, auto_encoder=auto_encoder, reverse=True)
        print(random.choice(pairs))

        # Randomize list
        random.shuffle(pairs)

        if phase == 'train':
            selected_pairs = pairs[0:int(0.8 * len(pairs))]
        else:
            selected_pairs = pairs[int(0.8 * len(pairs)):]

        # Getting the tensors
        selected_pairs_tensors = [tensorsFromPair(selected_pairs[i], input_lang, output_lang, max_input_length)
                     for i in range(len(selected_pairs))]

        self.transform = transform
        self.num_embeddings = num_embeddings
        self.max_input_length = max_input_length
        self.data = selected_pairs_tensors
        self.input_lang = input_lang
        self.output_lang = output_lang
Training/Evaluation
The training/evaluation of this model is done in a not very optimized way deliberately!! The reasons are as follows:
1. I followed the principle of
running with one clickthat I personnal have for all my open source projects. The principle says: “Everyone must be able to run everything by one click!”. So you see pretty much everything in one Python file!2. Instead of using ready-to-use RNN objects which process mini-batches of data, we input the sequence word-by-word to help the readers having a better sense of what is happening behind the doors of seq-to-seq modeling scheme.
3. For the evaluation, we simply generate the outputs of the system based on the built model to see if the model is good enough!
For mini-batch optimization, we input batches of sequences. There is a very important note for the batch feeding. After
inputing each batch element, the encoder hidden states must be reset. Otherwise, the system may assume the next sequence in a batch follows
the previously processed sequence. It can be seen in the following Python script:
for step_idx in range(args.batch_size):
  # reset the LSTM hidden state. Must be done before you run a new sequence. Otherwise the LSTM will treat
  # the new input sequence as a continuation of the previous sequence.
  encoder_hidden = encoder.initHidden()
  input_tensor_step = input_tensor[:, step_idx][input_tensor[:, step_idx] != 0]
  input_length = input_tensor_step.size(0)
Results
Some sample results for autoencoder training are as follows:
Input:  you re very generous  EOS
Output:  you re very generous  EOS
Predicted Output:  you re very generous  <EOS>

Input:  i m worried about the future  EOS
Output:  i m worried about the future  EOS
Predicted Output:  i m worried about the about  <EOS>

Input:  we re anxious  EOS
Output:  we re anxious  EOS
Predicted Output:  we re anxious  <EOS>

Input:  she is more wise than clever  EOS
Output:  she is more wise than clever  EOS
Predicted Output:  she is nothing than a than  <EOS>

Input:  i m glad i invited you  EOS
Output:  i m glad i invited you  EOS
Predicted Output:  i m glad i invited you  <EOS>